February 27th, 2012 · 9 Comments

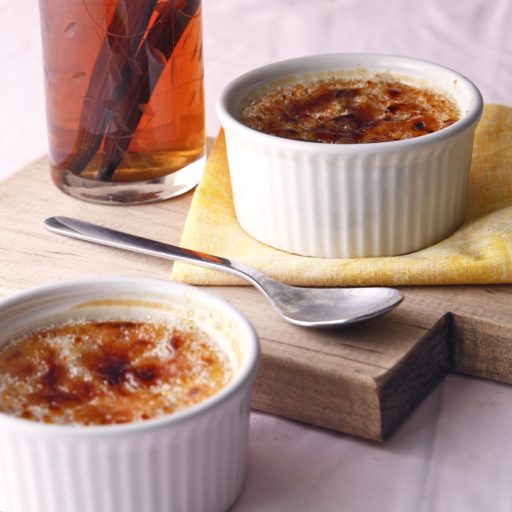
When I told my husband that I was making creme brûlée for my secret recipe club assignment, he nearly swooned. If you have been following Dishing the Divine for a while (and God bless you if you have… man, we’ve been through a lot together!  ) then you already know my hilarious creme brûlée story. You also know that I don’t like creme brûlée. Sometimes being a good wife means making something special just for the hubby. So, while this makes creme brûlée for two, in our house it really is just creme brûlée for one, served twice.
This recipe comes compliments of Fried Ice and Donut Holes, one of my fellow Secret Recipe Club bloggers. Melissa started her blog at the exact same time that I started mine, so I guess we’re blogging sisters! Melissa and I also seem to have similar perspectives on our blogs: they are a great way to share recipes with our friends and family, but, better yet, they’re a fabulous way to keep all our recipes in one place so that we can access them no matter where we are. If you’re like me, you are wondering where Melissa got such a strange name for her blog. The answer is so cute! I’ll let you read it for yourself. 
I decided that Cook’s Illustrated’s method for making creme brûlée may be a bit more involved but would result in more even results. The main difference in the two cooking methods is that Cook’s Illustrated suggests boiling the cream and sugar before putting the custard in the oven. This ensures that the sugar is completely dissolved into the cream mixture and does not sink to the bottom of the custard. They also recommend cooking the custard at a lower temperature and for a shorter time. I love recipes that involve using a thermometer to determine doneness since descriptions with color and jiggle-factor don’t really make sense to my very mathematical brain. I appreciate it when Cook’s Illustrated includes these details.
creme brûlée for two (secret recipe club)
Ingredients
1 cup heavy whipping cream
1/4 cup sugar
3 egg yolks
2 teaspoon vanilla extract
2 teaspoons turbinado sugar (if you'd don't have turbinado sugar, simply use slightly less regular cane sugar)
Instructions
- Adjust oven rack to lower-middle position and heat oven to 300 degrees.
- Combine the cream and 1/4 sugar in a medium saucepan and bring mixture to boil over medium heat, stirring occasionally to ensure that sugar dissolves. Take pan off heat, add the vanilla, and let cool 15 minutes.
- Meanwhile, bring a kettle or large saucepan of water to boil over high heat. Place two ramekins in an 8x8 or similarly sized oven-safe container.
- After the cream has cooled a bit, whisk the yolks in a large bowl until broken up. Whisk the cream mixture into the yolks until combined. Divide the mixture among the ramekins.
- Carefully place the baking dish with the ramekins on oven rack; pour boiling water into the baking dish, taking care not to splash water into the ramekins, until the water reaches two-thirds height of the ramekins. Bake until centers of custards are just barely set and are no longer sloshy and digital instant-read thermometer inserted in centers registers 170 to 175 degrees, 30 to 35 minutes (25 to 30 minutes for shallow fluted dishes). Begin checking temperature about 5 minutes before recommended time.
- Transfer ramekins to wire rack; cool to room temperature, about 2 hours. Set ramekins on rimmed baking sheet, cover tightly with plastic wrap, and refrigerate until cold, at least 4 hours or up to 4 days.
- Uncover ramekins; if condensation has collected on custards, place a paper towel on the surface to soak up moisture. Sprinkle each with about 1 teaspoon sugar (1 1/2 teaspoons for shallow fluted dishes); tilt and tap ramekin for even coverage. Ignite torch and caramelize sugar. Refrigerate ramekins, uncovered, to re-chill, 30 to 45 minutes (but no longer); serve.
2.2
http://www.dishingthedivine.com/2012/02/27/creme-brulee-for-two-secret-recipe-club/ Copyright 2012 Dishing the Divine
Tags: dessert · secret recipe club

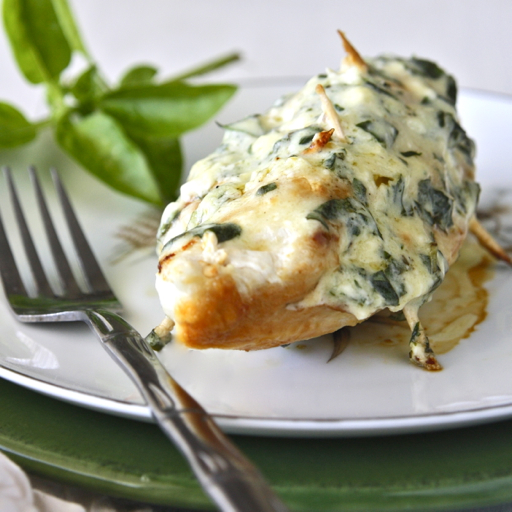
I’m not much of a chicken-breast-for-dinner girl. I used to be. When I was younger, it used to be my first choice when I ate at restaurants. Now I prefer chicken *in* my meals instead of chicken *as* my meal. When I saw this recipe, I thought, “Hmmm…. maybe I can bend the rules just this once.” I’m so glad I did. This was a phenomenal meal. So much cheese and basil and a hint of garlic all layered in and on top of a chicken breast that is cooked to perfection… I’m drooling at the thought of it. Serve this along with rice or potatoes or, better yet, these buttermilk biscuits. And swoon.
easy stuffed chicken breast with parmesan and basil filling
Source: recipe ingredients and idea from Cook's Illustrated Best Chicken Recipes Cookbook. Cooking methods are my own.
Ingredients
4 skinless chicken breasts (10-12 ounces each)
2 ounces Parmesan cheese, grated (about 1 cup)
2 ounces cream cheese, softened (about 1/4 cup)
1/4 cup minced fresh basil leaves
1 small clove garlic
1/8 tsp salt
1/8 tsp pepper
2 tbsp extra virgin olive oil
Instructions
- Pat the chicken breasts dry. Using a paring knife and starting at the center edge of one of the breasts, cut a slit into the breast leaving a 1 inch border around all sides. You will be stuffing the filling into this slit.
- Mix the cheeses, basil, garlic, salt, and pepper together until uniform. Reserve 1/4 cup of the filling. Divide the remaining filling into slit in each of the chicken breasts. Use toothpicks to cinch each of the slits closed.
- Heat a 12-inch skillet over medium heat. Add olive oil and heat until shimmering. Place the chicken breasts in the pan without crowding. Cook without disturbing until browned on the bottoms, about 3-5 minutes. Flip the chicken breasts and cook, covered, until a thermometer registers 160 to 165 in the middle of the meat, about 5-10 more minutes. Just before removing the chicken from the pan, remove the pan from the heat and spoon 1 tablespoon of filling over each breast. Cover and let rest for one to two minutes, or until filling is melted over the chicken breasts.
- Let chicken rest for 5 minutes before serving.
2.2
http://www.dishingthedivine.com/2012/02/13/easy-stuffed-chicken-breasts-with-parmesan-and-basil-filling/ Copyright 2012 Dishing the Divine
Tags: 60 min or less · chicken
February 8th, 2012 · 8 Comments

My friend Elba’s mom survived mostly on strawberry milkshakes while Elba was in her womb, and now Elba swears that’s the reason that the very idea of a strawberry milkshake is a turnoff for her. My mother loves peanut butter and finds all kinds of ways to slip it into her diet. She must have indulged this habit when I was in her womb, because for some reason, I have never loved peanut butter.* I know! Insane, right? Who doesn’t love peanut butter? And paired with chocolate? Am I even a proper foodie? Probably not. Oh, well. 
Nevertheless, I know that many of my readers (and friends!) are peanut butter lovers, so I still occasionally stash away a peanut butter recipe to share with everyone else in my life who is apparently more “normal” than I am. My friend Kim asked me to make a few desserts for a celebration dinner, so I decided it would be a perfect opportunity to make these peanut butter cookie and brownie layer bars. The recipe appealed even to me! I avoided making this for a while because it seemed too complicated. When I finally took the time to make it, I was surprised at how easily it came together. I saved a piece for my mom to try and her response was, “Yummy, yummy! Please send more!” Kim said that it was a hit at her event too. I guess that seals the deal. These are a winner!
*PS I’m 18 weeks pregnant and have survived the past four months almost exclusively on cereal and oranges. I wonder if my kid will *ever* eat these when he or she gets older?!
peanut butter cookie & brownie layer bar
Ingredients
This recipe requires making two separate batters. I suggest making the cookie batter first and then the brownie batter. Assembling is quite easy. You’ll need an 8×8 pan for this recipe.
Cookie Part
4 tbsp unsalted butter at room temperature
3 oz (1/4 cup plus two tablespoons) brown sugar
3 ounces (1/4 cup plus two tablespoons) sugar
1/4 cup peanut butter or any other nut butter
1 egg
1 teaspoon vanilla extract
7 ounces flour
1 teaspoon baking soda
1/2 teaspoon salt
Brownie Part
4 tbsp unsalted butter
3 3/4 ounces sugar
1 ounce unsweetened cocoa
1/4 teaspoon vanilla
1/4 teaspoon salt
1 egg
3 ounces chocolate, chopped (or chocolate chunks/chips)
1 ounce flour
Instructions
- Preheat the oven to 350°F. Line an 8×8 inch pan with parchment paper – up the sides too.
Prepare the Cookie Part
- Mix the butter and sugar together until thoroughly mixed. Add the peanut butter and mix in well.
- Add the egg and vanilla and mix in well.
- Add the flour, baking soda and salt and mix until the dough comes together – it will be crumbly.
- Set the cookie portion aside.
Prepare the Brownie Part
- Over a glass or metal bowl, melt the butter.
- Once the butter is melted, add the sugar and cocoa and mix well. The mixture will look grainy.
- Remove the bowl from the heat and allow the mixture to cool slightly.
- Add the vanilla and salt and mix in.
- Add the egg and mix in well – until completely blended together.
- Add the chocolate chunks and the flour and mix in well. Set aside.
Assembly
- Place 2/3 of the cookie mixture in the lined pan. Spread the mixture out so it makes an even layer on the bottom. Create a 1/2” tall lip around the edges – this will help hold in the chocolate portion.
- Add all of the brownie mixture and spread it out evenly, leaving a little gap around the edges.
- Crumble the remaining cookie mixture on top of the brownie mixture.
Bake
- Bake for 18-24 minutes until the top is golden and the center doesn’t jiggle too much. A tooth pick inserted in the cookie-only portion around the outside should come out clean, and if inserted in the center it should come out with no cookie bits but a few brownie crumbs are ok.
- Let cool in the pan before removing to a plate.
2.2
http://www.dishingthedivine.com/2012/02/08/peanut-butter-cookie-brownie-layer-bar/ Copyright 2012 Dishing the Divine
Tags: 60 min or less · dessert
![]() ) then you already know my hilarious creme brûlée story. You also know that I don’t like creme brûlée. Sometimes being a good wife means making something special just for the hubby. So, while this makes creme brûlée for two, in our house it really is just creme brûlée for one, served twice.
) then you already know my hilarious creme brûlée story. You also know that I don’t like creme brûlée. Sometimes being a good wife means making something special just for the hubby. So, while this makes creme brûlée for two, in our house it really is just creme brûlée for one, served twice. ![]()
![]()


